There are a few reasons that one might need to restore a SQL Server backup. Perhaps it is time to refresh a test database with a copy from production. Maybe there has been a disaster and this is how the disaster recovery plan is getting the system back online. Another common restore reason is to recover a single data element that was removed or modified in production by accident. Whatever the reason, being able to restore a database and understanding some of the basic options thereof is an essential skill for the SQL Server DBA.
For this demo I will cover the topic using the native SQL Server restore utility. Each of these native restores can also be completed using scripts, but for the beginner level that won’t be covered in this post. There are a multitude of 3rd party backup utilities that can also complete these tasks. While I won’t mention any of them specifically, most of them use similar logic and terms.
In the last entry I covered the 3 backup types, full, differential, and transaction log. Following the steps of this entry will allow for restoration of any allowable combination of the 3. All SQL Server native restores will start with the restoration of a full backup as this is the only type of file that includes the entire database. The differential backup includes only a list of changed data pages and the transaction log includes only a chronological list of transactions that occurred against a database. As such, the last 2 types have no value on their own and can only be applied in conjunction with a full backup.
There are 2 ways to launch the restore wizard from the SSMS Object Explorer. To replace an existing database expand the databases node, right click the database, Tasks, Restore, Database. To create a new database from a backup right click on the databases node and choose Restore Database.
Backup files are considered devices in the wizard so that is the radio button needed to browse the disk for backup files. The ellipses will open another new window to select files.
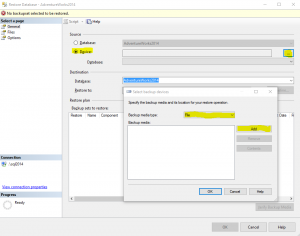
Upon selecting a full backup one then has the option to add more files. This is where a differential backup can optionally be added. Adding that file will tell the wizard to apply the full backup completely and then apply the differential on top of it. What is one “ok” button click to the user is actually 2 commands on the server. Since differential backup files are cumulative there is never a reason to apply more than 1 to a full backup.
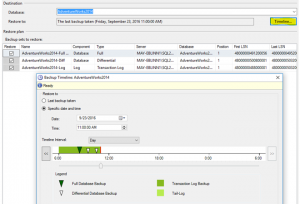
Whether or not a differential backup was added to the file list, at this point transaction log backup files (TRNs) can be optionally added to the restore. Since these files are NOT cumulative, there will likely be several of them if restoring to a point in time. These TRNs should be added chronologically. Adding several TRNs means that the one “ok” button click may end up being many commands to the SQL Server. This is transparent to the user using the restore utility.
If TRNs are added then the timeline button will become available. In that window a specific date and time can be selected if point in time recovery is desired.
Now that the backup files have been selected the target database name must be entered or verified. Type the desired name into the Destination Database text field.
Before starting the actual restore operation there are a few options available that need to be considered. This post will cover 3 commonly used options.
The first is the recovery state and can be found on the Options pane in the restore wizard. This option tells SQL Server about the plan for what to do with the database upon completing the restore command(s). There are 3 choices.
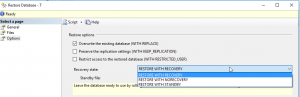
- RESTORE WITH RECOVERY – This choice tells SQL Server that the DBA is done restoring backup files and that the database should be brought up in a normal mode ready to accept read and write transactions.
- RESTORE WITH NORECOVERY – This tells SQL Server that the DBA is NOT done restoring files and wishes to later restore more files. This could be in anticipation of later restoring more log files manually or starting up a HADR solution such as mirroring or log shipping. Until the database is recovered it will be unavailable for any transactions and will report in Object Exporter as if it is still restoring, even after the restore is complete.
- RESTORE WITH STANDBY – This will recover the database for read only transactions. Later restores are possible.

The second option is REPLACE. It is also found on the Options pane as the first checkbox. The WITH REPLACE checkbox must be selected if overwriting an existing database. Without that checkbox an error will be given.
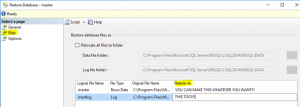
The final option covered in this article is MOVE. MOVE allows the data and log files from the database being restored to be moved or renamed. This becomes especially important when the database is being restored to a different machine with different drive letters or if a database is being restored as a copy to the same server whereby the file names will already be in use.
Once satisfied with all of the file selections and options simply click ok and let the utility do its thing!